


This article demonstrates how to create highly available VPN connections between Amazon Web Services (AWS) and Google Cloud (GCP) for direct communication between VPC networks across the two cloud platforms.
This article assumes that you’re familiar with basic concepts of Virtual Private Cloud (VPC) networks, Border Gateway Protocol (BGP), virtual private networks (VPNs), and IPsec tunnels.

Architecture overview
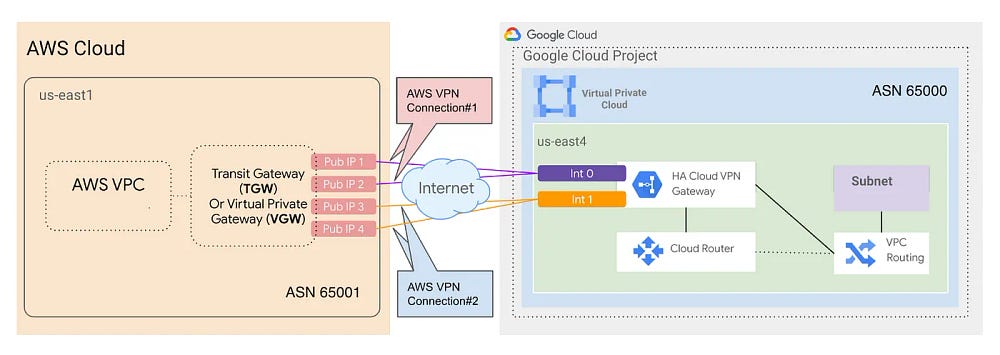
The architecture described on this article includes the following components:
Cloud Router: A fully distributed and managed Google Cloud service to provide dynamic routing using BGP for your VPC networks.
HA VPN gateway: A Google-managed VPN gateway running on Google Cloud. Each HA VPN gateway is a regional resource that has two interfaces, each with its own external IP addresses: interface 0 and 1.
VPN tunnels: Connections from the HA VPN gateway to the peer VPN gateway on AWS through which encrypted traffic passes.
Peer VPN gateway: Two AWS site-to-site VPN endpoints, which can be from an AWS virtual private gateway or AWS transit gateway.
Routing options and combined bandwidth over the VPN tunnels vary based on the Site-to-Site VPN option used on the AWS side:
Transit gateway: If you create the AWS transit gateway with no BGP preference, ECMP equally distributes traffic across active tunnels.
To use the VPN connectivity across multiple Google Virtual Private Cloud networks, use a connectivity VPC network to scale a hub-and-spoke architecture with multiple VPC networks.Virtual private gateway: If you use an AWS virtual private gateway, only one tunnel across all connections on the gateway is selected. To use more than one tunnel, instead use an AWS transit gateway so that equal-cost multipath (ECMP) is available.
For details about VPN route priority with AWS, see Site-to-Site VPN routing options.
For more information about AWS virtual private gateways, see Tunnel options for your Site-to-Site VPN connection.
Architecture Diagram:
Objectives
Create a VPC network on Google Cloud.
Create an HA VPN gateway and Cloud Router on Google Cloud.
Create customer gateways on AWS.
Create a VPN connection with dynamic routing on AWS.
Create an external VPN gateway and VPN tunnels on Google Cloud.
Verify and test the VPN connection between VPC networks on Google Cloud and AWS.
Costs
This article uses billable components of Google Cloud, including the following:
For an estimate of the costs for the Google Cloud components, use the Google Cloud pricing calculator.
This article uses billable components of Amazon Web Services, including the following:
AWS Transit Gateway
AWS Site-to-Site VPN
For an estimate of the costs for the AWS components, use the AWS pricing calculator.
Benefits
Increased Resilience & Redundancy: If one provider experiences an outage, workloads can seamlessly failover to the other.
Enhanced Uptime and Availability: Using independent infrastructures minimizes the risk of downtime, supporting strict SLAs.
Robust Disaster Recovery: Multi-cloud HA provides a solid disaster recovery strategy by geographically and operationally diversifying resources.
Avoidance of Vendor Lock-In: Deploying applications on both clouds offers the flexibility to optimize costs and performance without being tied to a single provider.
Optimized Global Performance: Leverage the extensive global networks of both GCP and AWS to reduce latency and improve user experience.
Regulatory Compliance & Data Sovereignty:
- Meet industry and governmental regulations by distributing data across multiple geographic regions.
- Ensure compliance with data residency and other regulatory requirements by utilizing compliant infrastructures in both clouds.Access to Best-of-Breed Cloud Services:
- Tap into the unique, high-performance services offered by each provider — for example:
— Serverless Computing: Use AWS Lambda alongside GCP Cloud Functions.
— Database Services: Combine Amazon RDS or DynamoDB with GCP’s Cloud SQL or Firestore.
— Data Analytics & Machine Learning: Leverage Google BigQuery and AWS’s suite of analytics tools to drive insights.
- Optimize your architecture by choosing the service that best fits each workload’s specific requirements.
Use Cases
Mission-Critical Applications: For sectors like finance, healthcare, and e-commerce where uptime and resilience are non-negotiable.
Disaster Recovery Scenarios: Primary workloads run on one cloud with a backup on the other, ensuring business continuity during outages.
Global Application Deployment: Deliver low-latency, high-performance experiences by serving a global customer base through the combined geographic reach of both providers.
Regulation & Compliance-Driven Architectures: Ideal for industries with strict data residency and regulatory mandates, such as banking or government services, ensuring data is stored and processed in compliant regions.
Load Balancing Across Clouds: Distribute traffic between GCP and AWS to optimize resource usage and mitigate localized issues.
DevOps & Testing Environments: Experiment with failover scenarios, performance testing, and service integration in a controlled multi-cloud setup.
Terraform module
You can use the gcp-to-aws-ha-vpn-terraform-module module to provision HA VPN between Google Cloud and AWS.
CLI Steps
You can use this artical for CLI:
https://cloud.google.com/network-connectivity/docs/vpn/tutorials/create-ha-vpn-connections-google-cloud-aws#create-the-ha-vpn-gateway-and-cloud-router-on-google-cloud
Console Steps
Prerequisites:
Create Project in GCP & AWS
Enable Compute Engine API in GCP
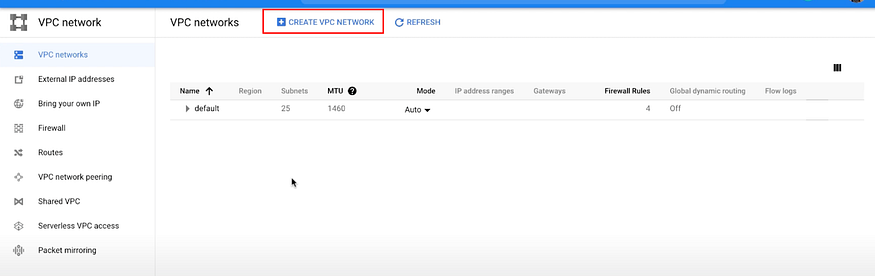
Step: 1 Create a VPC network on GCP
We will start by creating a VPC network on GCP.
You can skip this step if you already have a VPC.
a) Go to Networking > VPC Network > VPC networks > CREATE VPC NETWORK
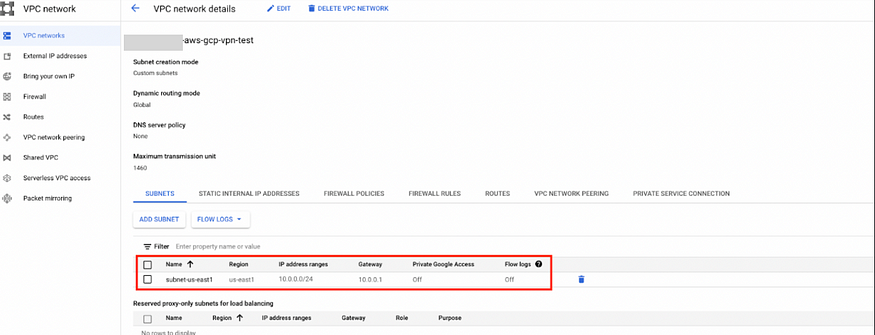
b) We will also create a subnet with the IP range 10.0.0.0/24 in the us-east1 region.
Make Dynamic Routing Mode to Global
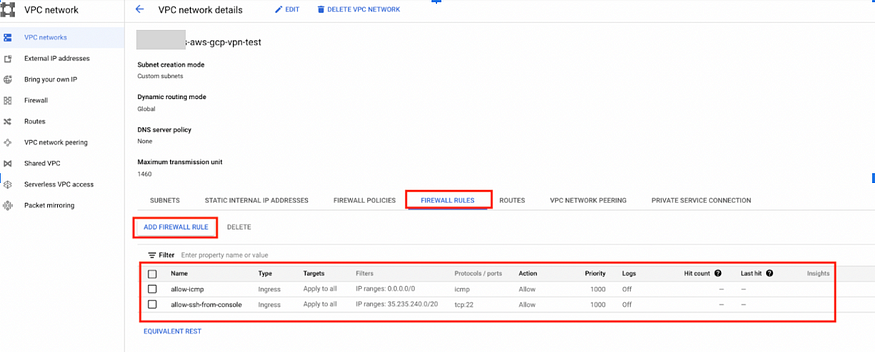
c) Add Firewall Rule on the same network.
allow-icmp (anybody can ping on the instances in this network for testing).
allow-ssh-from-console (we only want to allow ourselves, so we can log in through ssh using GCP console).
Go to FIREWALL RULES\> ADD FIREWALL RULE
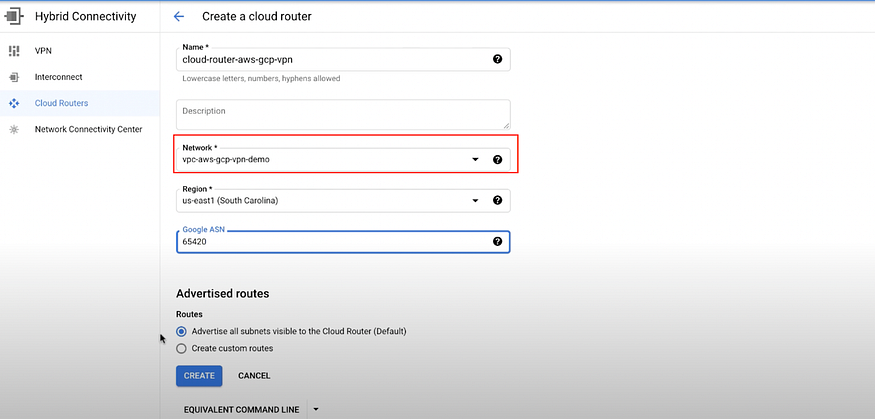
Step: 2 Create a Cloud Router in GCP
a) Go to Hybrid Connectivity > Cloud Routers > CREATE ROUTER
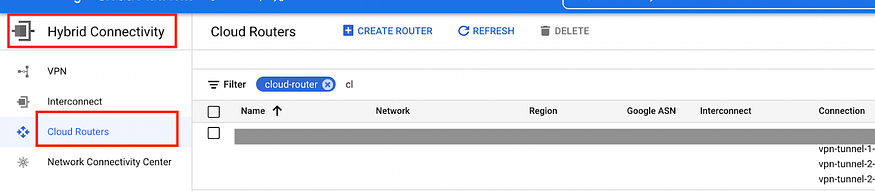
Select your VPC network created in step 1a in Network*.
Click on Create.
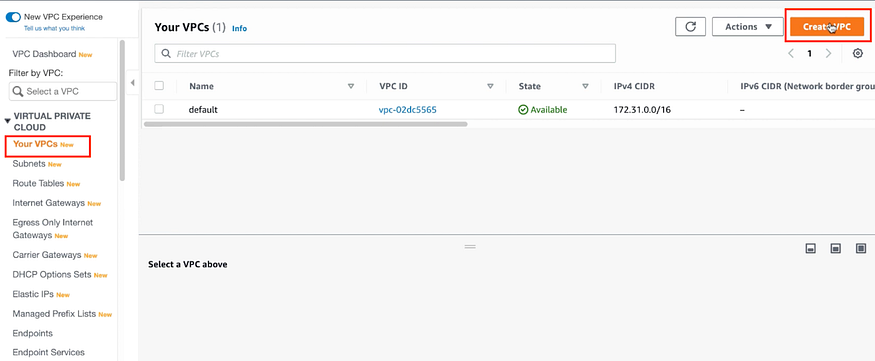
Step: 3 Create a VPC on AWS
We will start by creating a VPC network on AWS.
You can skip this step if you already have a VPC.
a) Go to VIRTUAL PRIVATE CLOUD > Your VPCs > Create VPC
You must check that DNS hostnames are Enabled in your AWS VPC.

If not do it:
Click on Actions as shown below.
Select Enable then Save Changes.

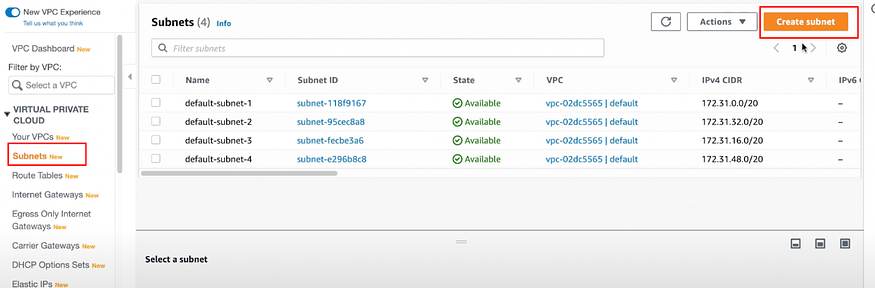
b) Create a subnet with the IP range 10.1.0.0/24 in us-east1 region.
Go to VIRTUAL PRIVATE CLOUD > Subnets > Create subnet
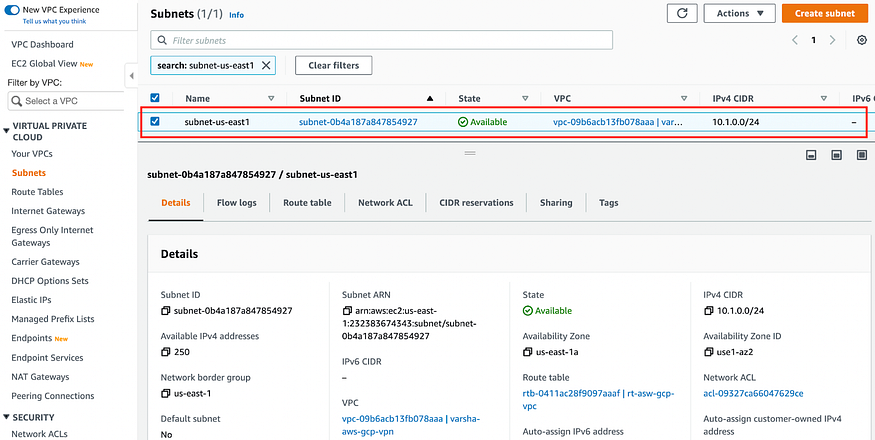
c) When we create VPC it created the Route Table for us.
By default, it is not associated with any subnet.
So edit and rename Route Table, and save it.
Go to VIRTUAL PRIVATE CLOUD > Route Tables

Next click on Edit subnet association
select your subnet and save associations
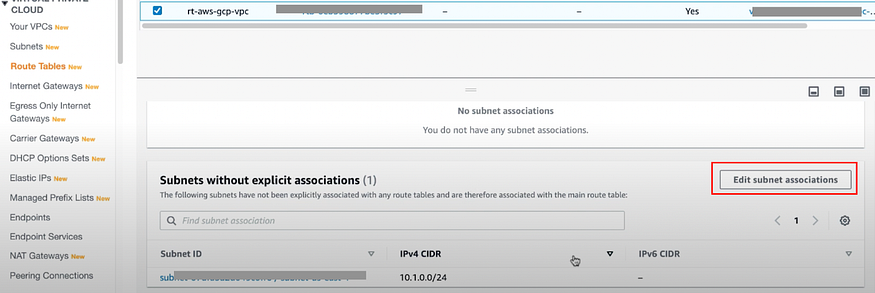
After this go to Subnet associations, To see details of subnet your route table is associated with.
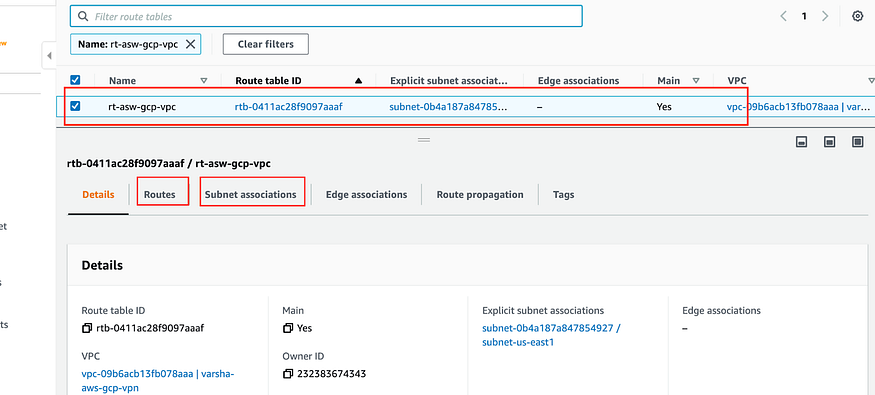
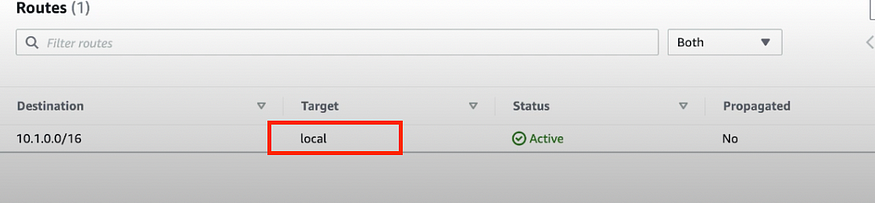
Go to Routes you will see local route.
It says route everything that is within the given CIDR range to the local network.
d) Create an Internet Gateway.
Go to VIRTUAL PRIVATE CLOUD > Internet Gateways > Create Internet Gateway
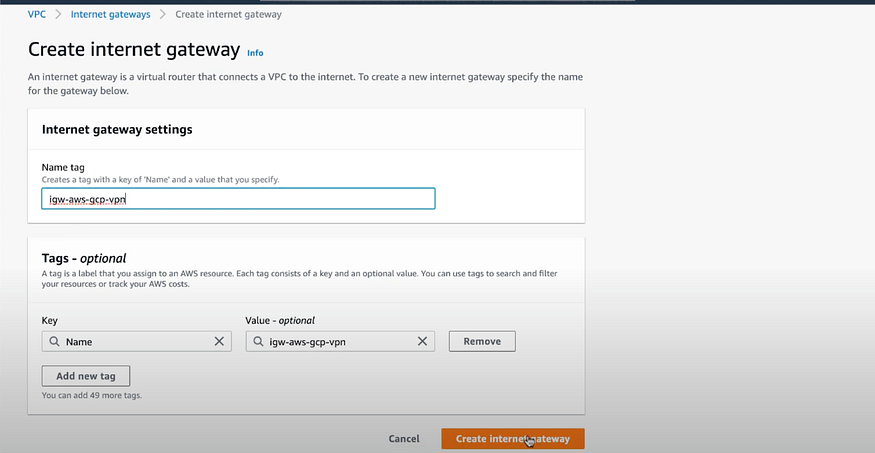
Next click on Attach to VPC then select VPC we created in previous step 3a.
Then Click on Attach internet gateway

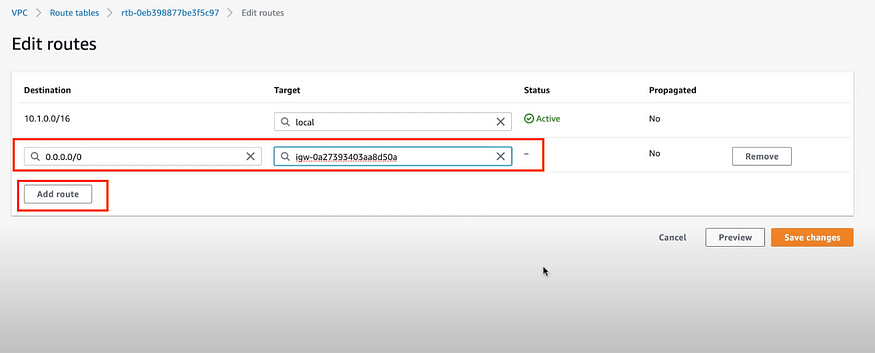
e) Go to the Route Tables again as shown in step 3c.
Click on Edit Route.
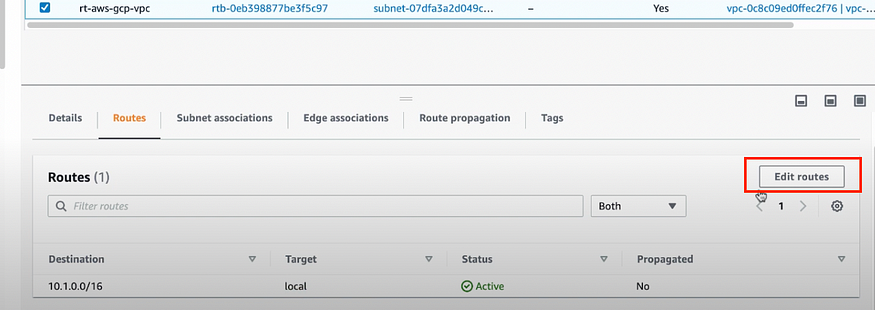
Then Add Route 0.0.0.0/0 as shown below in Destination.
Then select your Internet gateway created in previous step 3d.
Then click on Save changes
AWS site setup for now is done.
We will now go to the GCP site to continue there.
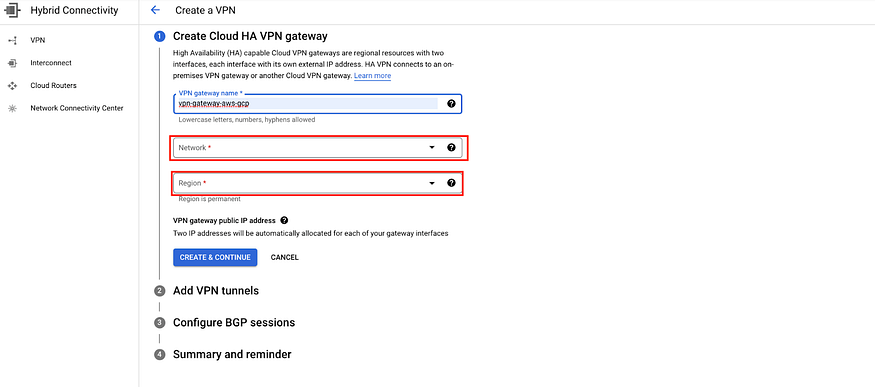
Step: 4 Start creating the VPN on the GCP side
a) Go to Networking > Hybrid Connectivity > VPN > Create VPN connection.
Select High-Availability (HA) VPN
Click on Continue

b) Enter a VPN gateway name, then select the Network created in previous step 1a then Region.
Click on CREATE & CONTINUE
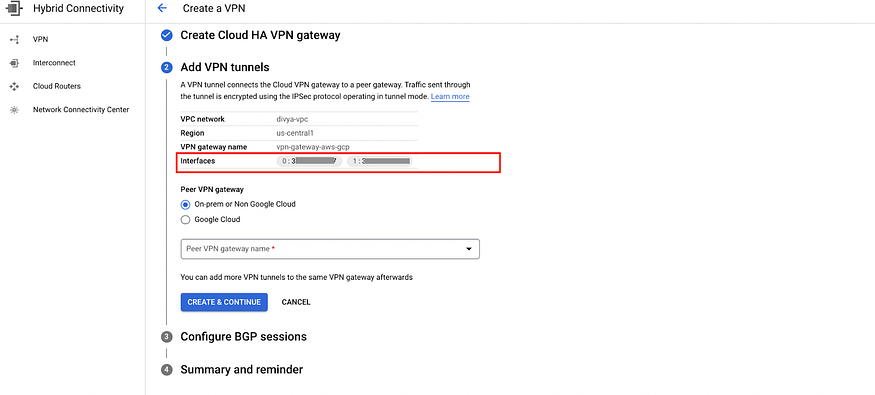
c) Now it will give 2 interfaces because we have selected HA VPN option.
Note: Must Cancel or stop right there on the same window when you reach above step 4b because we need to create the AWS components first.
Write down 2 IP addresses assigned to VPN gateway.
They are also available under VPN Connection > VPN gateways

Now Go to AWS and do some setup there.
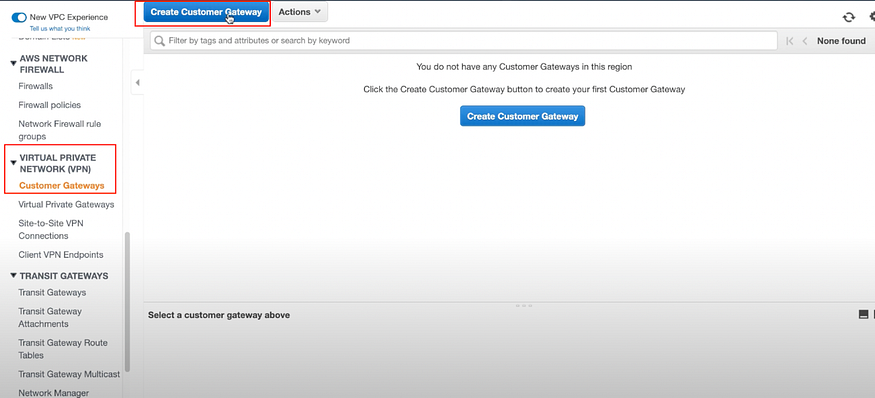
Step: 5 Create 2 AWS Customer Gateways
a) In AWS:
Go to VPC > Virtual Private Network(VPN) > Customer Gateways > Create Customer Gateway
You need to create one customer gateway per IP address given in step 4c.
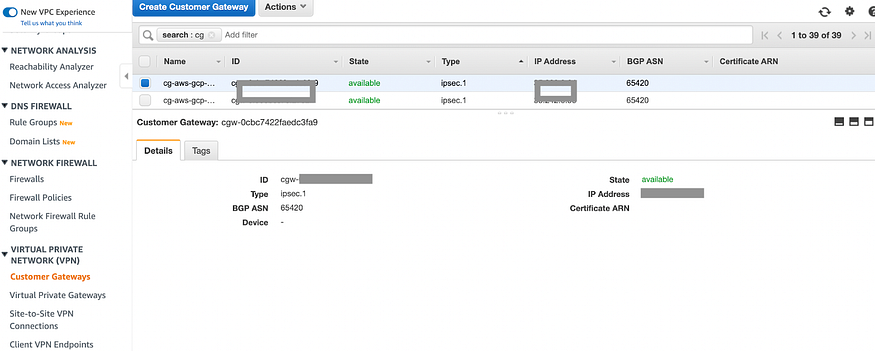
Enter the name.
BGP ASN: It’s going to be the same ASN configured in Cloud Router — GCP.
IP Address: Same Ip address in 1st interface in step 4c.
Click on Create Customer Gateway

Create one more Customer Gateway in the same way. In IP Address give the 2nd interface IP we got in step 4c.
- There needs to be a VPN connection between each customer gateway and the virtual private gateway, so 2 VPN connections are required.
Step: 6 Create AWS Virtual Private Gateway
a) Go to VPC > Virtual Private Network(VPN) > Virtual Private Gateways> Create Virtual Private Gateway
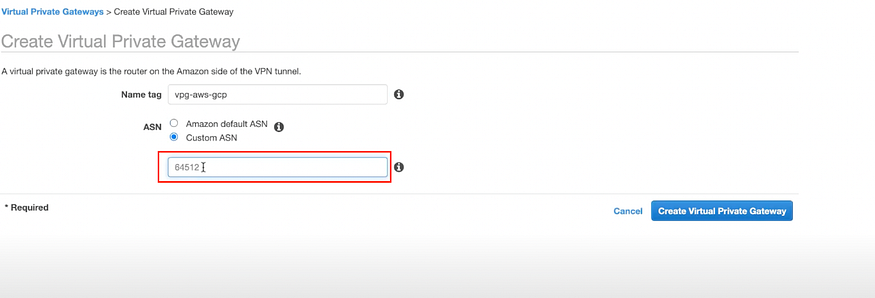
Note: There is only one Virtual Private Gateway. Make sure it is not the same ASN that we used in previous step 2a*.*
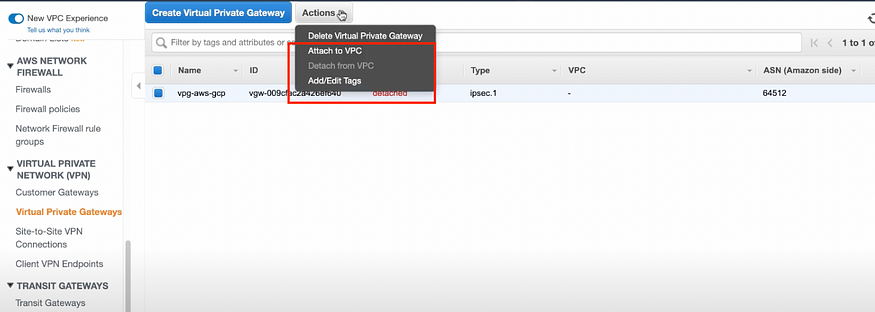
VPG will be created but it will be in a detached state.
You need to attach it to your AWS VPC.
Click on Actions, Select the VPC, Yes, Attach
Note: It will take some seconds to come in the attached state.
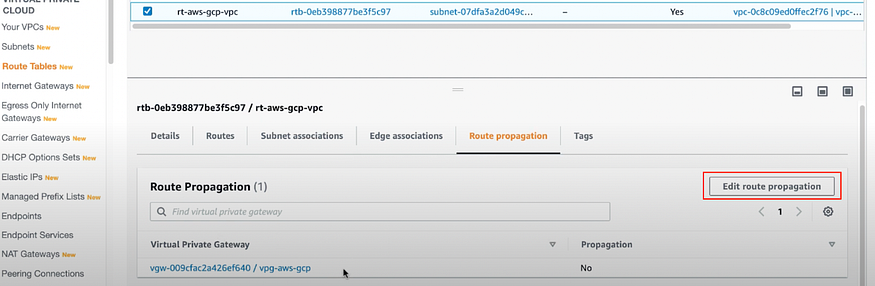
b) Now Go to Route Tables again. And we need to make some changes there.
Go to Route Tables.
Select the Route Table which we created in the earlier step 3c.
Go to something called Route Propagation.
You will see it has Virtual Private Gateway you created already association here.Click on Edit route propagation > Enable > Save
Step: 7 Create 2 AWS VPN Connections
a) In AWS:
Go to VPC > VIRTUAL PRIVATE NETWORK (VPN) > Site-to-Site VPN Connections > Create VPN Connections
- There needs to be a VPN connection between each customer gateway and virtual private gateway, so 2 VPN connections are required.

b) We will create 2 VPN Connections.
Enter the name “aws-gcp-vpn-1”.
Select Virtual Private Gateway from drop down created in step 6a “vpg-aws-gcp” in VPG.
Remember you have 2 customer gateway created in step 5a.
Select 1st Customer Gateway in Customer Gateway ID.
Leave the rest of the field as it is.
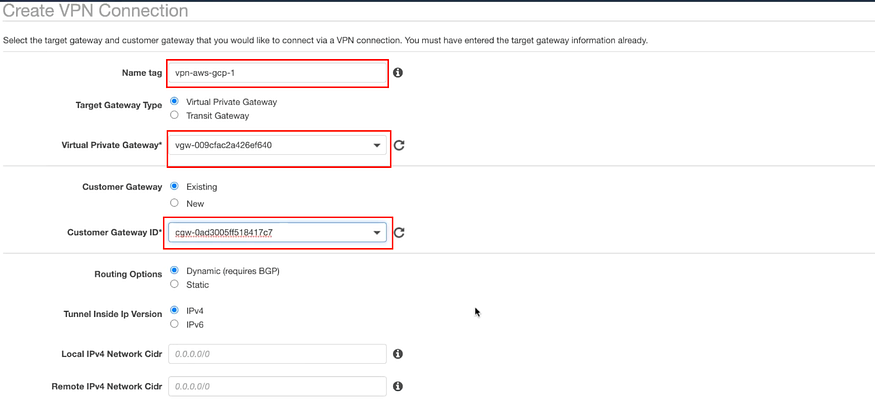
Next, we must configure tunnels.
c) Click on the Edit Tunnel 1 Options you will see lots of options.
We don’t need all of them.
One can remove the settings which you do not want to apply to VPN Connection.
You can select as shown below
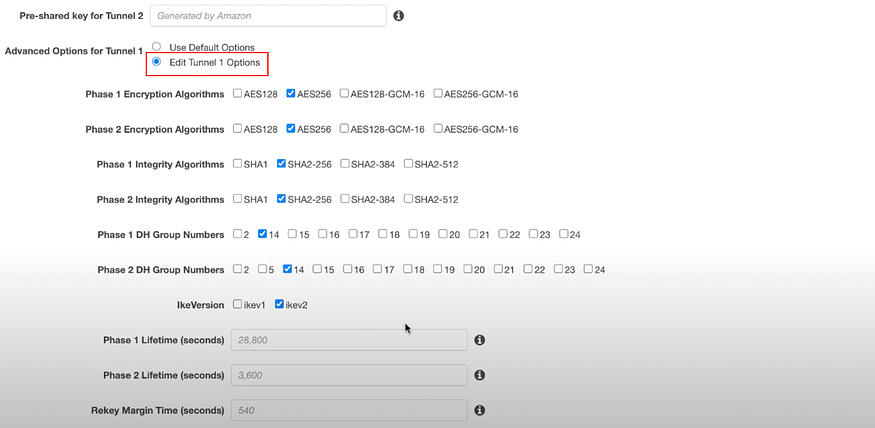
We have to do this setting for all 4 tunnels i.e. “2 for VPN 1” & “2 for VPN 2”.
Click on Edit Tunel 2 Options.
Configure same as did for Tunnel 1.
Repeat complete step 7 for 2nd VPN connection i.e. “aws-gcp-vpn-2”.
Don’t forget to change Customer gateway with the 2nd one.
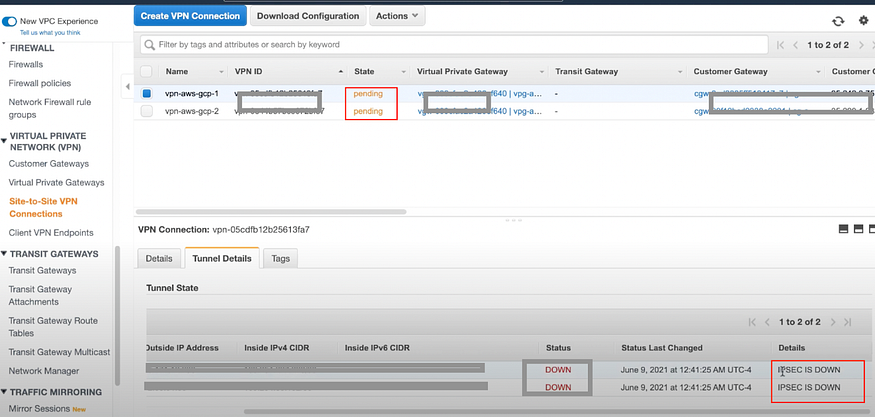
Next, You will see VPN state pending.
In Tunnel Details Status is DOWN and IPSEC IS DOWN because we didn’t connect them to GCP part tunnels yet.
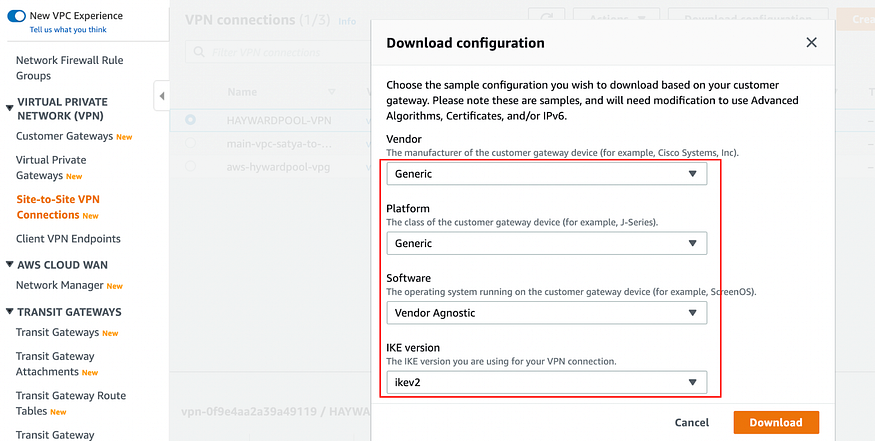
c) Download configuration files for each of these VPN connections one by one from the Download Configuration tab
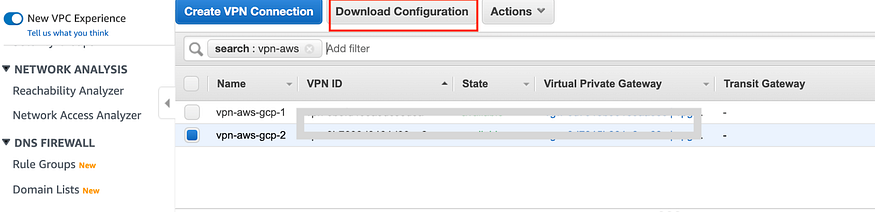
Set the Vendor and Platform as Generic and IKEv as the same you selected while configuring tunnel in step 7c.
Click on Download.
Step: 8 Create Peer VPN Gateway on GCP.
We will continue on same wizard where we left off in step 4c.
a) Select On-prem or Non-Google Cloud and click on CREATE NEW PEER VPN GATEWAY from the drop-down
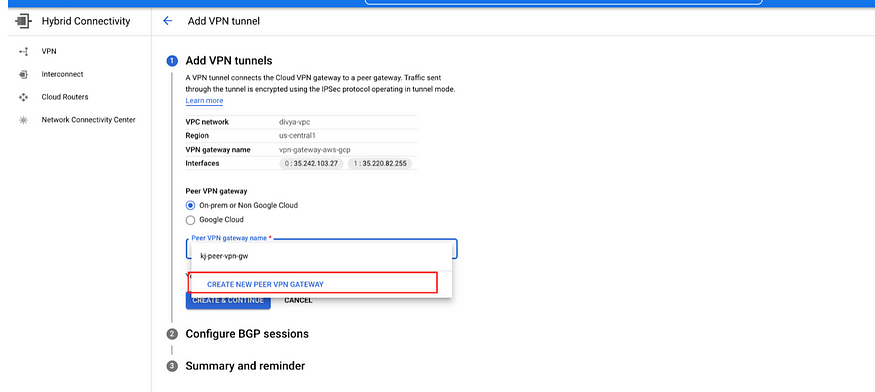
b) Enter the peer VPN Gateway Name.
Select Create 4 VPN tunnels (Required for connect to AWS).
Enter the 4 outside IPs from step 7c.Open configurations file and start looking for outside IP addresses for all four interfaces.
For Interface 0 IP address:*In File 1 go to
IPSec Tunnel #1 > #3: Tunnel Interface Configuration > Outside IP Addresses:
— **Virtual Private Gateway** : X.X.X.X*For Interface 1 IP address:*In File 1 go to
IPSec Tunnel #2 > #3: Tunnel Interface Configuration > Outside IP Addresses:
— **Virtual Private Gateway** : X.X.X.X*For Interface 2 & 3 IP address: Refer to same steps in File 2.
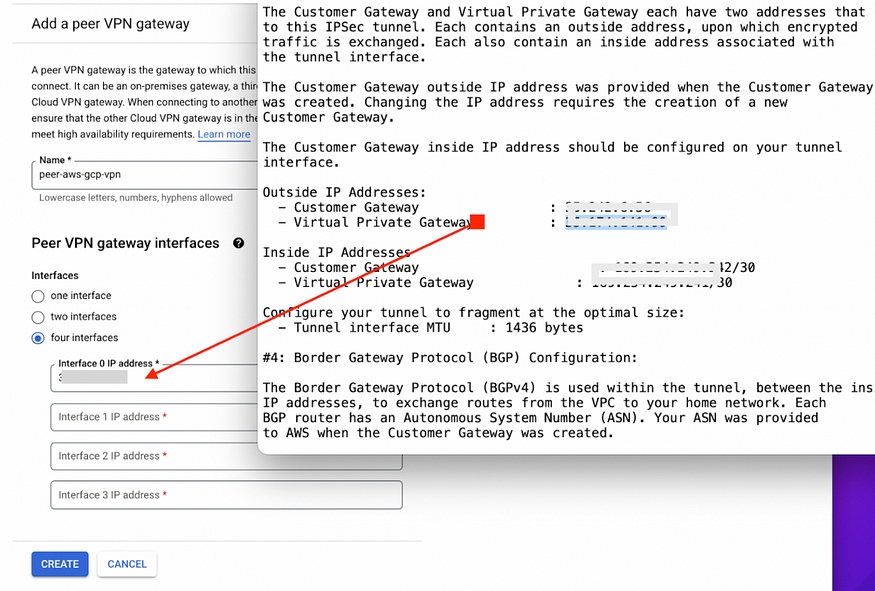
- Click CREATE. Now our Peer VPN Gateway has been created after gives us 4 tunnels as shown below.
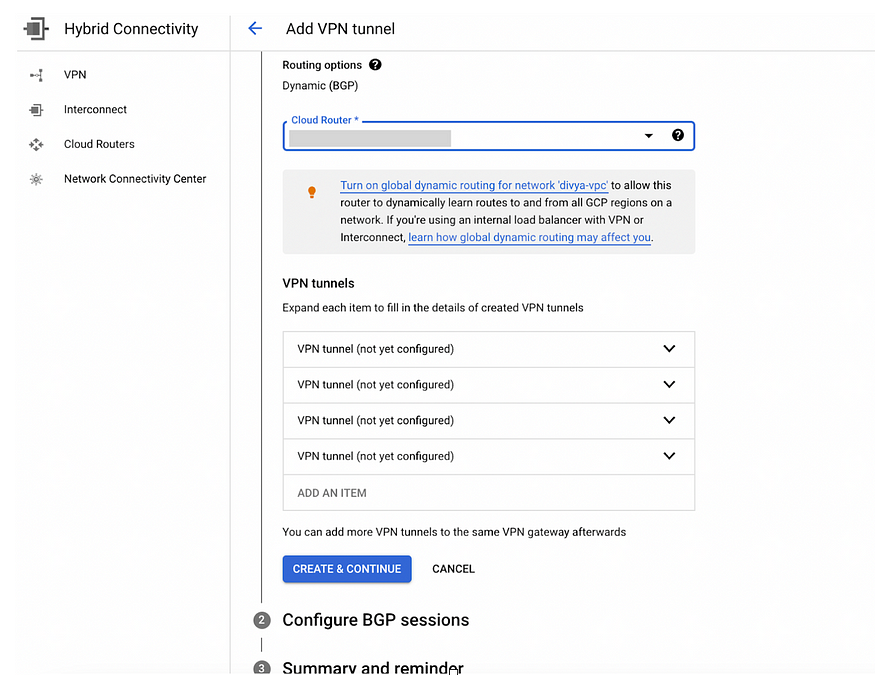
select the cloud router created in step 2a.
- Now let’s configure tunnels
c) Click and Create 4 VPN tunnels (Required for connect to AWS)
Name this “vpn-tunnel-1–1”
IKEv2
For IKE pre-shared key*In File 1 go to
IPSec Tunnel #1 > — **Pre-Shared Key** : XXXXXXXXXXX*Then click on Done
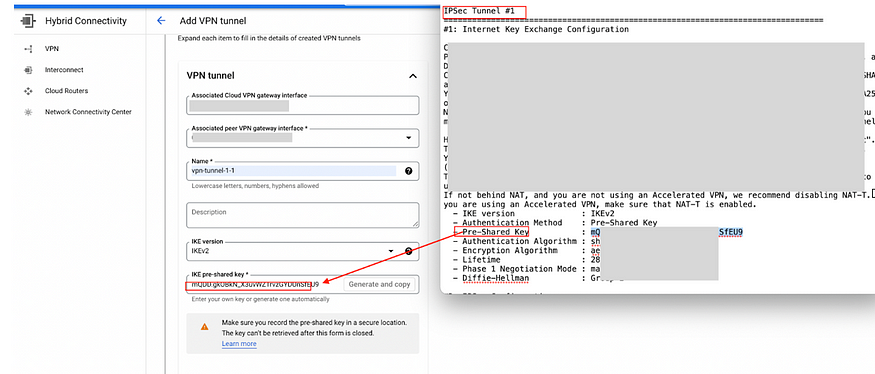
do same steps for 2nd tunnel
In File 1 go to
IPSec Tunnel #2 > — Pre-Shared Key : XXXXXXXXXXXThen click on Done
Repeat same steps in File 2 for the left two tunnels key.
Then click on Create & Continue
So our tunnels are created.
But Still, we need to configure BGP session.
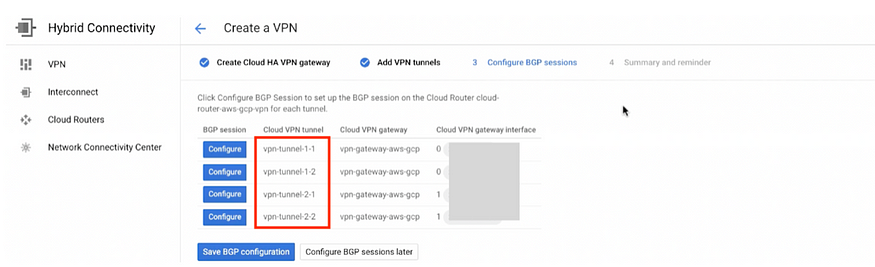
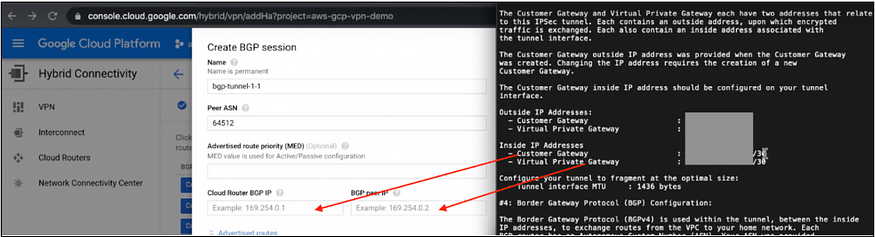
Step: 9 Configure the BGP sessions
Click on Configure in 1st tunnel: vpn-tunnel-1–1
BGP Tunnel 1 — Inside IP CIDR X.X.X.X/30
Enter name“bgp-tunne-1–1”
Peer ASN is 64512 (ASN number of VPG in AWS in step 6a)
In all 4 BPG sessions Peer ASN will be same.Cloud Router BGP IP is X.X.X.X/30
In File1 go to
IPSec Tunnel #1 > #3: Tunnel Interface Configuration > Inside IP Addresses
— Customer Gateway : X.X.X.X/30The BGP peer IP is X.X.X.X/30
In File1 go to
IPSec Tunnel #1 > #3: Tunnel Interface Configuration > Inside IP Addresses
— Virtual Private Gateway : X.X.X.X/30Click on Save and Continue
Next, BGP Tunnel 2 — Inside IP CIDR X.X.X.X/30
Refer to the same steps as in 1
Cloud Router BGP IP is X.X.X.X/30
In File1 go to
IPSec Tunnel #2 > #3: Tunnel Interface Configuration > Inside IP Addresses
— Customer Gateway : X.X.X.X/30The BGP peer IP is X.X.X.X/30
In File1 go to
IPSec Tunnel #2 > #3: Tunnel Interface Configuration > Inside IP Addresses
— Virtual Private Gateway : X.X.X.X/30Click on Save and Continue
For Tunnel 3 & 4 repeat the same steps in File2
Next click on Save BGP Configuration. Now you can see that everything is Green (BGP status) is green and VPN tunnel status is also green.
Click on OK
Go to CLOUD VPN TUNNELS
You can see VPN tunnel status is Established.
BGP sessions status is Established.
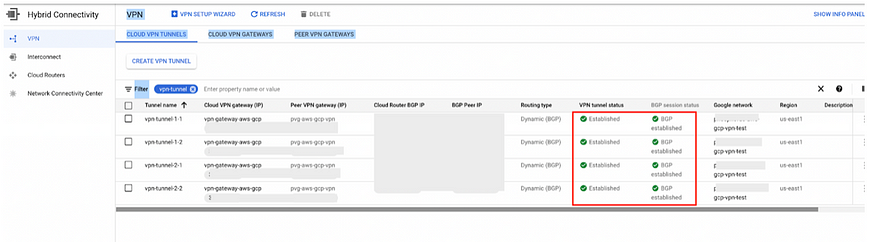
Now, Go to AWS site you can see in AWS Site-to-Site VPN.
Click on VPN> Tunnel details> Tunnel status will become UP within a some of minutes.
Step: 10 Testing VPN Connection between GCP to AWS
We set up this all because we want to communicate between AWS & GCP using Private IP addresses not Public IP addresses.
Create Ec2 Instance in AWS (Having public IP & Private IP)
VM Instance in GCP (Having public IP & Private IP)
From local machine, ping Public IP of GCP VM and AWS Ec2 Instance.
You will see it is working (We added allow-icmp for 0.0.0.0/0 which means anybody who can pings instances and will get a response back).From local machine, ping Private IP of GCP VM and AWS Ec2 Instance.
You will get Request timeout (Can’t reach from local system right Because no VPN Connectivity from any of the cloud from local machine.Ping Private IP of GCP VM in AWS Ec2 Instance and vice-versa through ssh.You will see that it’s working (VPN Connection got established between GCP and AWS).
Summary
VPN connectivity is an essential tool for businesses that use multiple cloud providers. This allows businesses to securely and reliably connect their cloud networks. As we saw, creating a VPN between cloud providers is not a difficult process, but you need to understand where to acquire the values for each step. Keep that in mind!
To ensure the security of the VPN connection, it is important to follow best practices such as using strong authentication and encryption, using dedicated VPN gateways, and regularly monitoring the connection. By following these best practices, businesses can take advantage of the scalability, flexibility, and features of multiple cloud providers while ensuring the security and reliability of their cloud networks and workloads.
References
Amazon Web Services. AWS Site-to-Site VPN.
Google Cloud. Create HA VPN connections between Google Cloud and AWS.
RFC 4271. (2006). A Border Gateway Protocol 4 (BGP-4).